BORED WITH YOUR USUAL WORKOUT? THIS ONE WILL CHANGE THAT

Thumbnail for Bored with your usual workout? This one will change that

Superset 1

Perform each movement for 45 seconds, then go straight into the next. Do three sets, resting 90 seconds between each. You’ll need some space in your home to get sweaty and a set of medium-weight dumbbells.

A. Dumbbell deadlift

Stand with your feet slightly wider than hip-width distance, holding dumbbells in front of your thighs with your palms facing in. With a slight bend in your knees, push your hips back and slowly slide the weights down your legs toward the floor. Keeping your spine straight, push through your heels to return to start for one rep.

B. Dumbbell floor press

Start lying on your back with knees bent and feet flat on the floor. Hold one dumbbell in each hand, upper arms flat on ground, elbows out at 45-degree angles from ribcage, and weights hovering above chest, palms facing away from you with straight wrists. Press weights up until arms are fully extended. Slowly lower back to start for one rep.

Superset 2

Perform each movement for 45 seconds, then go straight into the next. Do three sets, resting 90 seconds between each.

A. Dumbbell bent over row

Stand with your feet slightly wider than hip-width distance, holding dumbbells in front with your palms facing each other. Hinge forward at the hips, keeping a flat back, dumbbells now in front of knees. This is your starting position. Row dumbbells up toward chest, try to bring arms to 90-degree bend with elbows close to body, then return to start for one rep.

B. Dumbbell glute bridge

Start lying on your back holding dumbbells on hips, knees bent, feet flat on the floor hips width-distance apart. Squeezing your glutes, press through the heels to raise hips, forming a straight line between your shoulders and knees, keeping your neck relaxed and space between chin and chest. Slowly lower back to start for one rep.

Superset 3

Do 3 sets of 20 reps.

Curve sit up

Start lying down with arms extended overhead, feel flexed toward ceiling. Trying to keep your lower back on the floor for as long as possible, slowly bring arms overhead and toward your toes, engaging abs. When your arms have touched your toes (depending on how flexible you are), slowly return to start for one rep.


Source: wellandgood.com


Sharing is Caring!


Learn The Benefits Of Training With Dumbbells

Learn The Benefits Of Training With Dumbbells

In most strength and bodybuilding training programme, the barbell is usually the preferred reference. When we talk about how you one can bench, squat or deadlift, we mean the exercises done using the barbell.

However, what many people do not know is that dumbbell training provide many advantages to athletes, bodybuilders and anybody that trains for general fitness.

In many cases, dumbbell exercises are actually much better than its barbell counterparts. This article will give you a list of the advantages of dumbbell exercises over barbell exercises.

Balance
Training with dumbbells requires more balance than with barbells or machines. Most of us are unsymmetrical in strength. One arm or one leg tend to be stronger than the one on the other side. With a barbell, the stronger arm cannot assist the weaker arm when you train with dumbbells. So when training with dumbbells, you have to use the resistance that the weaker arm can handle. Training with dumbbells will prevent the imbalance of strength and muscle development. Also enhance athletic performance, a significant consideration in fitness programs.

Unilateral Training
One huge benefit of training with dumbbells is that you can train one limb at a time. This can emphasize greater movement specificity in the training programs of athletes and greater program variety for bodybuilders. By training for one limb, you can improve the strength and muscle mass of a limb without effecting the other. Definitely helps in case you have an imbalance of development.

Stability
Dumbbell training requires more muscular control than barbells. You can check it yourself when comparing dumbbell benchpress with barbell bench press. So in order to train with dumbbells, you will need to recruit more stabilising muscles, enhancing joint stability and hypertrophy and kinesthetic awareness.

Safety
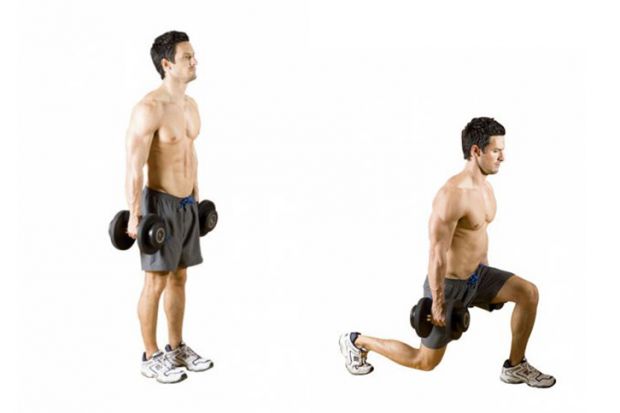
Some exercises can be done safer with a pair of dumbbells than a barbell. When performing certain types of leg exercises like step-ups or lunges, it is usually much easier and safer to hold a paid of dumbbells in your hands rather than a barbell on your back. If you lose your balance, you just need to drop the dumbbells from your hands instead of letting the barbell slide off your back.

Dumbbells are much safer when you work out alone without any spotter. With dumbbell benchpress, you can put the dumbbells to your sides without any problem at all.

Another safety benefit of dumbbell training is that it can prevent potential injuries in the shoulders, elbows and wrists. You can see the problem when comparing doing barbell curl or barbell benchpress with dumbbell curl or dumbbell benchpress.

When you curl or bench press with a barbell, your hands are fixed and this leads to unnatural positions for the joints. But if you curl or benchpress with dumbbells, your elbows, wrists and shoulders are allowed to rotate freely and naturally.

Conclusion
Both dumbbells and barbells are equally effective in general for your training goal, but in some specific situations one type of exercise may be a little more beneficial for you than the other. So the best advice for you is to combine both dumbbell training and barbell training into your work out program and get the most out of both types of training.


Source : workoutbox.net


Sharing is caring!


7 Day Jiggle-Free Arms Weekly Workout Challenge

Greater is the number of people who are struggling with fat arms. Their dream is to see their arms toned and in a perfect shape. If you are listing yourself among those people, the following article will help you how to make your dream come true. Following is a workout plan for 7 days, during which you will need to perform 5 easy exercises that after a short period of time will lead you to strong and defined arms.

  1. First Day

– perform 5 arm circles;

– perform 5 chair dips;

– perform 5 walking planks;

– perform basic planks in a period of 5 seconds; and

– perform 5 burpees.

  1. Second Day

– perform 10 arm circles;

– perform 10 chair dips;

– perform 10 waking planks;

– perform basic planks in a period of 10 seconds; and

– perform 10 burpees.

  1. Third Day

– perform 15 arm circles;

– perform 15 chair dips;

– perform 15 walking planks;

– perform basic planks in a period of 15 seconds; and

– perform 15 burpees.

  1. Fourth Day

– perform 20 arm circles;

– perform 20 chair dips;

– perform 20 waling planks;

– perform basic planks in a period of 20 seconds; and

– perform 20 burpees.

  1. Fifth Day

– perform 25 arm circles;

– perform 25 chair dips;

– perform 25 walking planks;

– perform basic planks in a period of 25 seconds; and

– perform 25 burpees.

  1. Sixth Day

– perform 30 arm circles;

– perform 30 chair dips;

– perform 30 walking planks;

– perform basic planks in a period of 30 seconds; and

– perform 30 burpees.

  1. Seventh Day

– perform 35 arm circles;

– perform 35 chair dips;

– perform 35 walking planks;

– perform basic planks in a period of 35 seconds; and

– 35 burpees.

Following are the detailed directions how each exercise needs to be performed.

  1. Arm Circles

Start the exercise by standing on both your knees and place your arms out from the sides in a straight position. As this your arms need to be perpendicular to your torso and parallel with the ground. Make the first movement by performing circles of around 1 foot in diameter with each of your outstretched arms. Make repetitions of the same movement but this time in the opposite direction.

  1. Chair Dips

Start the exercise by placing your hands on a bench or stable chair. The same need to be on a distance same as the distance of your shoulders. Extend your legs out in front of you so that you will be able to drive your butt off the front of the bench or chair. In order to lower your body towards the floor, bend your elbows slowly until the same form and angle of 90 degrees. When you will be at the bottom of the movement, you need to straighten your elbows by pressing your body down to the bench. Then you may return to the starting position.

  1. Walking Planks

Start the exercise by placing your body in a plank position. As you are maintaining your rigid plank form, push your body off the floor and one by one elevate your arms so that you will get into a press-up position. Then you may return to the starting position.

  1. Basic Planks

Start the exercise by placing your body into a push-up position. This means that the upper part of your body should be in a same straight line with the toes and elbows. Your elbows and toes need to be lifted a little bit. Try to stay into this straight position, breathe deeply, and feel how your muscles are turning into strong ones. At the next point you will need to contract your muscles, but pay attention to divide the body weight equally in the both legs and elbows, so that you will maintain balance and strength.

  1. Burpees

Start the exercise by placing your body in a standing position so that your feet will be on a distance same as the distance of your shoulders. Then lower your body until the same reaches a squat position. Place your hands in front of you on the floor so that you can bring your feet back. The chest should be lowered to a push-up position. Then bring your chest back up, bring your feet in a starting position and quickly jump up into the air and clap your hands above your head.

Related Post:

Source: female-fit-body.com

Don't forget to share and like!